Abstract: 1.Introduction of common packaging tools Among packaging tools, RequireJS, browserify, and webpack are common. Among them, Requ...
1.Introduction of common packaging tools

Among packaging tools, RequireJS, browserify, and webpack are common. Among them, RequireJS is a JavaScript module loader, which is based on the implementation of the ADM (asynchronous module definition) specification. Browserify is a tool that uses Node.js modules in browsers as a starting point, while webpack is a tool built for packaging front-end modules
2.Use of tools
(1) RequireJS, as an npm package, provides an executable r.js tool, which is executed through the command line in the following way:
Npm install-g requirejs
R.js-o app.build.js
(2) The command line tool provided by browserify is used as follows:
Npm install-g browserify
Browserify main.js-o bundle.js
(3) Use of webpack
Use the command to install and use, as shown below:
Npm install webpack-g
Webpack main.js-o bundle.js
In the above command line, we have simply installed the webpack globally and packaged the main.js file.
3.Project construction
For front-end projects, webpack plays the role of a construction tool, not a code dependency, and should be installed in dev dependencies, using the following command:
Npm install webpack-save-devIn this example, a simple application will be built, including two js modules
1.Hello module (hello.js) that generates the text "Hello world"
Module.exports = 'Hello world'2.Index.js module for printing text (index.js)
Var text = require ('. / hello')
Console.log (text)
and index.html files for displaying content in the front-end browser.
<!DOCTYPE html>
<html lang="en">
<head>
    <meta charset="UTF-8">
    <title>Title</title>
</head>
<body>
<script src="./bundle.js"></script>
</body>
</html>
The bundle.js file introduced in the src path above does not exist, because it has not been created yet. After using the webpack to create the packaged js file, create it as shown in the following command:
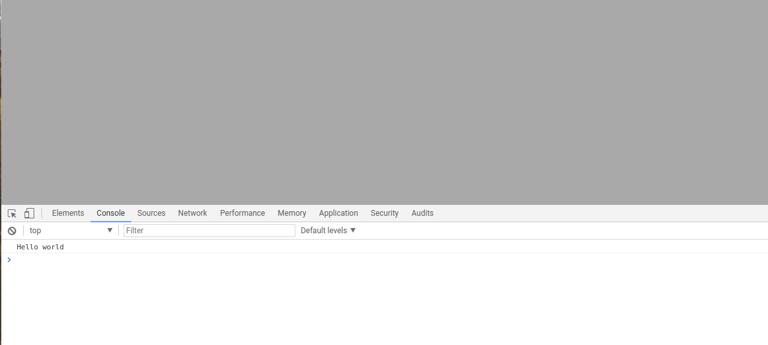
Webpack. / index.js bundle.jsAfter executing the above command,
we can see the printed result in the browsing console Hello world.
In this way, we have realized the implementation principle of a simple project. The packaged content is bundle. js, and we can see the packaged content, no code will be posted here. Of course, if we write code in this way to build, it is of little significance, so we have to mention another advantage of webpack, that is, the use of configuration files. Before using configuration files, we install the style loader, as shown in the following command:
Npm install style-loader css-loader-save-devWith the above configuration, we can load styles, then we set the webpack configuration file. First, we need to create the webpack.config.js file under the project. The contents are as follows:
Var path = require ('path')
Module.exports = {
  Entry: path.join (_ _ dirname, 'index')
  Output: {
    Path: _ _ dirname
    Filename: 'bundle.js'
  }
  Module: {
    Loaders: [
      {
        Test: /\ .css $/
        Loaders: ['style-loader',' css-loader']
      }
    ]
  }
}
In the above code:
- Entry: indicates the entry file of the project.
- Output: indicates the result output after the construction package. There are still multiple configurations in the output object, such as the output path and output file name used above.
- The module.loaders is the configuration for the loader in the module. The value is an array. Each item of the array specifies a rule. The test field of the rule is a regular expression. If the ID of the dependent module conforms to the regular expression, the dependency is converted using the loader. In this way, we can use the webpack command to convert the code.
The code can be packaged by the following command line command.
WebpackBy executing the above command, the file can also be packaged, and the style can also be displayed when the file is displayed. To prove that styles can indeed be introduced, we create an index.css file that looks like this:
Body {
    Background-color: darkgray
}
Then introduce it into the index.js we created earlier, and the modified code is as follows:
// import style from'. / index.css'
Var style = require ('. / index.css')
Var text = require ('. / hello')
Console.log (text)
In the above code, what is commented out is the imported form of the node module, while the usage specification of CommonJS is in use, after packaging with the same command, we can see the following effect in the browser:
The style is displayed
Of course, webpack can also build projects in real time through webpack-dev-server. Use the following command to install webpack-dev-server:
Npm install webpack-dev-server-save-devAfter installation, we can configure to use the server. First, our package.json file will be more like this. The new content is as follows:
"scripts": {
    "test": "echo\" Error: no test specified\ "& exit 1"
    "start": "webpack-dev-server-inline"
  }
After adding this command, we can start the webpack-dev-server server with the following command:
Npm run startThe complete package.json after that is as follows:
{
  "name": "react-basics-review"
  "version": "1.0.0"
  "description": "a practise of react study"
  "main": "index.js"
  "scripts": {
    "test": "echo\" Error: no test specified\ "& exit 1"
    "start": "webpack-dev-server-inline"
  }
  "repository": {
    "type": "git"
    "url": "git+ https://github.com/suwu150/react-basics-review.git""
  }
  "author": "jkwu"
  "license": "ISC"
  "bugs": {
    "url": "https://github.com/suwu150/react-basics-review/issues""
  }
  "homepage": "https://github.com/suwu150/react-basics-review#readme","
  "devDependencies": {
    "babel-plugin-transform-object-rest-spread": "^ 6.23.0"
    "babel-preset-es2015": "^ 6.24.1"
    "css-loader": "^ 0.28.5"
    "lodash": "^ 4.17.4"
    "mocha": "^ 3.5.0"
    "react": "^ 15.6.1"
    "style-loader": "^ 0.18.2"
    "webpack": "^ 3.5.5"
    "webpack-dev-server": "^ 2.7.1"
  }
  "dependencies": {
    "lodash": "^ 4.17.4"
  }
}
The webpack configuration file is modified to read as follows:
The commonly used configuration object properties in devServer are as follows:
1.ContentBase: ". /" // the directory in which the local server builds the page. Generally, we can use the current directory.
2.HistoryApiFallback:true // is very useful when we build spa applications It uses HTML5 History Api, and any jump or 404 response can point to an index.html page.
3.Inline:true // configuration used to support automatic refresh of dev-server.
Webpack has two modes to support automatic refresh,
one is iframe mode, the other is inline mode.
Using iframe mode does not need to be configured in devServer,
it only needs to be accessed using a specific URL format
However, we usually use inline mode. After setting inline to true in devServer,
When we start webpack-dev-server,
we still need to configure inline to take effect,
which we'll talk about later.
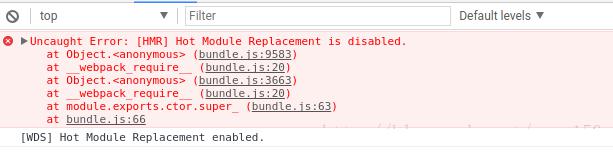
4.Hot: true //Start the webpack hot module replacement feature. This is also the place with the most holes. Many blogs have set hot to true. In fact, setting hot to true does not work, and an error will be reported, as shown in the following figure:
This is because the plug-in is not used during use, just add the following command to the configuration file:
  Plugins: [
    New webpack.HotModuleReplacementPlugin ()
  ]
That is, the hot module plug-in processing that calls webpack.
5.Port: Port number (default is 8080)
6.Other configuration information:
- Packaging information is not output in the quiet console
- compress enables gzip compression
- progress shows the progress of packaging
- open automatically opens the browser
var path = require('path');
const webpack = require ("webpack");
module.exports = {
  entry: path.join(__dirname, 'index'),
  output: {
    path: __dirname,
    filename: 'bundle.js',
    publicPath: "/assets/",
  },
  module:{
    loaders: [
      {
        test: /\.css$/,
        loaders: ['style-loader', 'css-loader']
      }
    ]
  },
  plugins:[
    new webpack.HotModuleReplacementPlugin(),
  ],
  devServer:{
    // We configure webpack-dev-server here
    contentBase: "./",
    historyApiFallback:true,
    inline:true,
    hot:true
  }
};
The contents of the index.html file are modified to the following face format:
<!DOCTYPE html>
<html lang="en">
<head>
    <meta charset="UTF-8">
    <title>Title</title>
</head>
<body>
<div>I don't know what I'm gonna Do When I'm in the mountains</div>
<script src="assets/bundle.js"></script>
</body>
</html>
That is, the path is modified,
because the server path is configured in the webpack.config.json file,
and the publicPath: "/assets/", item is modified,
execute npm run start on the command line to see the server starts normally,
and then go to the browser to access it, as shown below:

So far, the configuration of webpack real-time construction has been completed. When a style file or js file is modified, the project will be repackaged and automatically refreshed and loaded into the browser. As the following link prompts, build a webpack dev server for real-time construction, At the same time, the code used in this project is at the github address as follows: github address.