Abstract: 1. The current dilemma of Web development File dependencies are complex. Static resource request is inefficient. Modularization s...
1. The current dilemma of Web development
- File dependencies are complex.
- Static resource request is inefficient.
- Modularization support is not friendly.
- Browsers are less compatible with advanced Javascript features.
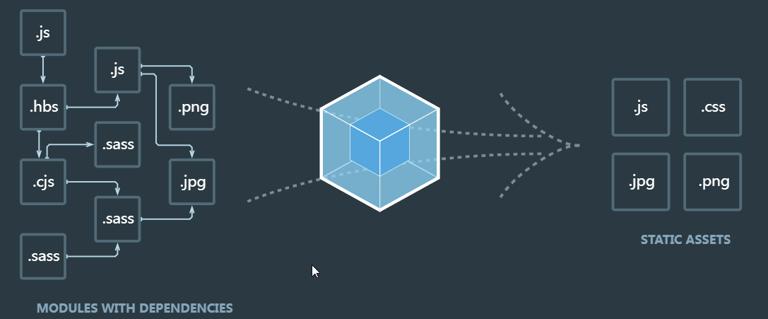
2. Overview of webpack
Webpack is a popular front-end project building tool (packaging tool),
which can solve the difficulties faced by current web development.
Webpack provides friendly modular support,
as well as powerful functions such as code compression confusion,
handling js compatibility issues, and performance optimization,
Thus, the programmer can focus on the specific function implementation,
and improve the development efficiency and maintainability of the project.
At present, the front-end projects in most enterprises are packaged and built based on webpacks.
3.Basic use of webpack
A. Create project directory and initialize
Create a project, open the terminal of the directory where the project is located, and enter the command:
Npm init-y
B.Create homepage and js file
Create an index.html page in the project directory and initialize the page structure: place a ul in the page and several li in the ul
Create the js folder in the project directory, and create the index.js file in the folder
C.Install jQuery
Open the project directory terminal and enter the command:
Npm install jquery-SD.Import jQuery
Open the index.js file, write code to import jQuery and implement the following functions:
   Import $from "jquery"
Please $(function () {)
$("li:even") .css ("background", "cyan")
$("li:odd") .css ("background", "pink")
Please})
Note: At this time, the project will run with errors, because import $from "jquery"; This code belongs to the new syntax code of ES6. There may be compatibility problems in browsers, so we need webpack to help us solve this problem.
E.Install webpack
1.Open the project directory terminal and enter the command:
npm install webpack webpack-cli-D2.Then, in the project root directory,
create a webpack.config js configuration file is used to configure the webpack.
Write code in the webpack.config.js file to configure webpack.
module.exports = {
        Mode: "development" / / can be set to development (development mode), production (release mode)
    }
Note: mode sets the compilation mode of the project.
If it is set to development, it means that the project is in the development stage, will not be compressed and confused, and the packaging speed will be faster; If it is set to production, it means that the project is in the online publishing stage, which will be compressed and confused, and the packaging speed will be slower.
3.Modify the package.json file in the project and add the running script dev as follows:
"scripts": {
        "dev": "webpack"
    }
Note: scripts under the scripts node can be run through npm run, such as:
Run the terminal command: npm run dev.
Webpack will be launched to package the project.
4.Run the dev command to package the project, and import the js file generated by project packaging in the page. Open the project directory terminal and enter the command:
npm run dev
After the webpack is packaged, find the main.js file generated in the default dist path and import it into the html page. (The dist folder and main.js are generated by default). Browse the page to see the effect.
4.Set the packaging entry/exit of webpack
In webpack 4.x,
by default, the src/index.js as the default packaging entry js file.
By default, the dist/main.js output js file as default package.
If you do not want to use the default ingress / egress js file,
we can set the ingress / egress js file by changing webpack.config.js, as follows:
  Const path = require ("path")
    Module.exports = {
        / / set the development mode to be used when development-- is developed using production-- when launching
        Mode: "development"
        / / set the entry file path
        Entry: path.join (_ _ dirname, ". / src/budle.js")
        / / set the export file
        Output: {
            / / set the path
            Path:path.join (_ _ dirname, ". / dist")
            / / set the file name
            Filename: "res.js"
        }
    }
5.Set automatic packaging of webpacks
By default, we change the code of the entry js file, and we need to rerun the command to package webpack to generate the exported js file
Then you have to re-execute the command packaging every time, which is a very tedious thing, so automatic packaging can solve such a tedious operation. The steps to implement automatic packaging are as follows:
A.Install the package with automatic packaging function: webpack-dev-server
Roomnpm install webpack-dev-server-D
B.Modify the dev instruction in package.json as follows:
       "scripts": {
"dev": "webpack-dev-server"
Answer}
C.Change the path of the imported js file to:
Real-time updates are invisible to us in the virtual path in memory.
<script src= "/ bundle.js" > < / scrip> absolute path.
D. Run npm run dev to package
E. Open the URL to view the effect: http://localhost:8080
Note: the output files automatically packaged by webpack-dev-server are placed in the root directory of the server by default. We can't find it in our local directory. It exists in virtual memory.
6.Configure automatic opening of web pages
Application scenario:
You do not need to manually enter the URL in the search box to visit.
After npm rum dev,
it will automatically jump to the page.
The implementation method is to open the package.json file and modify the dev command:
-
- open: After packaging, the configuration of the browser will be opened automatically. The default browser will be used instead of writing.
- -host: Configure IP address.
- -port: Configuration port.
"scripts": {
"dev": "webpack-dev-server-open 'google chorme'-host 127.0.0.1-port 8080"
}
7. Configure html-webpack-plugin
Using html-webpack-plugin, you can generate a preview page without us/src to open the portal file. Because when we visit the default http://localhost:8080/, we see some files and folders, and if we want to view our page, we need to click on the folder to view it, so we want to see a page by default instead of a folder or directory. The steps to implement the default preview page feature are as follows:
A.Install the package with default preview function: html webpack plugin
Please npm install html-webpack-plugin-D
B.Modify the webpack.config.js file as follows:
    // Import package
Require const HtmlWebpackPlugin = require ("html-webpack-plugin")
Create // create an object
Resume const htmlPlugin = new HtmlWebpackPlugin ({
Preview // sets the template file that generates the preview page
"template:". / src/index.html "
Preview // sets the name of the generated preview page
"filename:" index.html "
// set to index before it is turned on by default. Internal mechanism
Please})
C.Continue to modify the webpack.config.js file and add plugins information:
       Module.exports = {
Plugins: [htmlPlugin]
Answer}
8.Loader in webpack
Package non-js modules through loader: by default,
webpack can only package js files.
If you want to package non-js files, you need to call the loader loader to package.
The loader includes:
1). Less-loader can package .less related files
2). Sass-loader can package and deal with .scss-related files
3). Url-loader packaging deals with files related to url paths in css
4). Babel-loader loader for handling advanced js syntax
5). Postcss-loader handles the compatibility of css
6). Css-loader,style-loader packing style related files
Note: the order in which multiple loader is specified is fixed, while the order in which loader is called is called from back to front, which depends on the previous.
8.1 Packaging and processes css files
1.Run the npm I style-loader css-loader-D command to install loader for processing css files
2.In webpack.config Js module ->rules array,
add loader rules as follows
// matching rules for all third-party file modules
Module.exports = {
Module: {
Rules: [
/ / css-loader should be written after style-loader
{test: /\ .css $/, use: ['style-loader',' css-loader']}
]
}
}
Where, test represents the matched file type,
and use represents the corresponding loader to be called. Note:
Note:
- The loader order specified in the use array is fixed.
- The order of multiple loader calls is:
call from back to front, which depends on the previous.
8.2 Packaging processes less files
1.Run the npm I less-loader less- D command.
2.In the module-> rules array of webpack.config.js,
add the loader rule as follows:
// matching rules for all third-party file modules
Module: {
Rules: [
{test: /\ .less $/, use: ['style-loader',' css-loader', 'less-loader']}
]}
8.3 Packaging processes scss files
1.Run the npm I sass-loader node-sass-D command
2.In the module-> rules array of webpack.config.js,
add the loader rule as follows:
// matching rules for all third-party file modules
Module: {
Rules: [
{test: /\ .scss $/, use: ['style-loader',' css-loader', 'sass-loader']}
]}
Add: when you fail to install sass-loader, it is mostly due to network reasons. For more information, please see: https://segmentfault.com/a/1190000010984731?utm_source=tag-newest
8.4 Configure postCSS to automatically add compatible prefixes of css (- ie -, - webkit -)
1.Run the npm I postcss-loader autoprefixer-D command
2.Create the configuration file postcss.config.js for postcss in the project root directory,
and initialize the following configuration:
Const autoprefixer = require ("autoprefixer")
Module.exports = {
    Plugins: [autoprefixer]
}
3.In the module-> rules array of webpack.config.js,
modify the loader rule of css as follows:
Module: {
Rules: [
{test:/\ .css $/, use: ['style-loader',' css-loader', 'postcss-loader']}
]}
8.5 package pictures and font files in the stylesheet
Sometimes setting the background image and setting the font file in the stylesheet css also needs to be processed by loader.
Use url-loader and file-loader to process packaged picture files and font files.
1.Run the npm I url-loader file-loader-D command
2.In the module-> rules array of webpack.config.js,
add the loader rule as follows:
Module.exports = {
    Module: {
        Rules: [
            {
                Test:/\ .scss $/
                Use: ['style-loader','css-loader','sass-loader']
            }, {
                Test:/\ .jpg | png | gif | bmp | ttf | eot | svg | woff | woff2 $/
                / / limit is used to set the number of bytes. Only pictures that are less than the limit value will be converted to base64 pictures.
                Use: "url-loader?limit=16940"
            }
        ]
    }
}
Base64 format, url display is no longer a path, but a pile of characters, used for small pictures to speed up their rendering

8.6 Advanced syntax in packaging processing js files
Packaging the advanced syntax in the js file: when writing js, we sometimes use a higher version of the js syntax
It is possible that these high versions of syntax are not compatible, we need to package them into compatible js code, and we need to install babel series packages.
1.Installing the babel converter
Npm install babel-loader @ babel/core @ babel/runtime-D
2.Install the babel syntax plug-in package
Npm install @ babel/preset-env @ babel/plugin-transform-runtime @ babel/plugin-proposal-class-properties-D
3.Create and configure the babel.config.js file in the project root directory
   Module.exports = {
        Presets: ["@ babel/preset-env"]
        Plugins: ["@ babel/plugin-transform-runtime", "@ babel/plugin-proposal-class-properties"]
    }
4.Configuration rules: change the rules array in the module of webpack.config.js
Module.exports = {
    Module: {
        Rules: [
            {
                Test:/\ .js $/
                Use: "babel-loader"
                //exclude is an exclusion, meaning not to process js files in node_modules
                Exclude:/node_modules/
            }
        ]
    }
}