Abstract: Preface In development, we usually need a clean 3D Earth instance. This article will introduce how Cesium initializes an Earth, ...
Preface
In development,
we usually need a clean 3D Earth instance.
This article will introduce how Cesium initializes an Earth,
including displaying and hiding map controls,
as well as loading some commonly used images and annotations.
Cesium is a world-class JavaScript open-source product for 3D Earth and Maps.
It provides a development package based on JavaScript language,
making it easy for users to quickly build a zero plugin virtual Earth web application.
It also provides high-quality guarantees in terms of performance,
accuracy, rendering quality,
as well as multi platform and ease of use.
Earth initialization
Apply for Token
Before formal development,
we first need to register a free Cesium ion account.
The steps are as follows
First, open the https://cesium.com/ion, then register a new account.
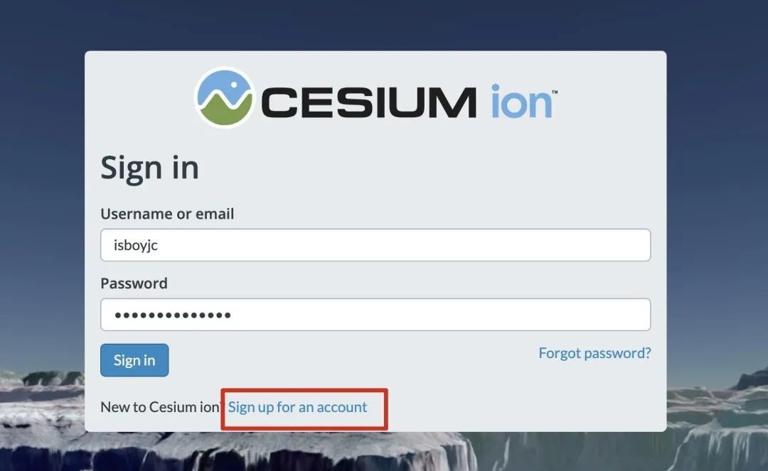
After successful registration,
log in, click on Access Token,
and go to the "Access Tokens page" page.

As shown above,
select 'Default' to copy the default access token into the content.
Cesium.Ion.defaultAccessToken = '<YOUR ACCESS TOKEN HERE>'Of course, if you're just writing a demo,
then it's okay not to write a Token.
Default initialization
After the environment is ready, we can initialize the Cesium instance, which means loading the Earth.
<template>
<div class="map-box">
<div id="cesiumContainer"></div>
</div>
</template>
<script>
var viewer = null
export default {
name: "No01Init",
data() {
return {}
},
mounted() {
Cesium.Ion.defaultAccessToken = '<YOUR ACCESS TOKEN HERE>'
// viewer = new Cesium.CesiumWidget('cesiumContainer')
viewer = new Cesium.Viewer("cesiumContainer")
console.log(viewer)
},
}
</script>
<style scoped>
.map-box {
width: 100%;
height: 100%;
}
#cesiumContainer {
width: 100%;
height: 100%;
}
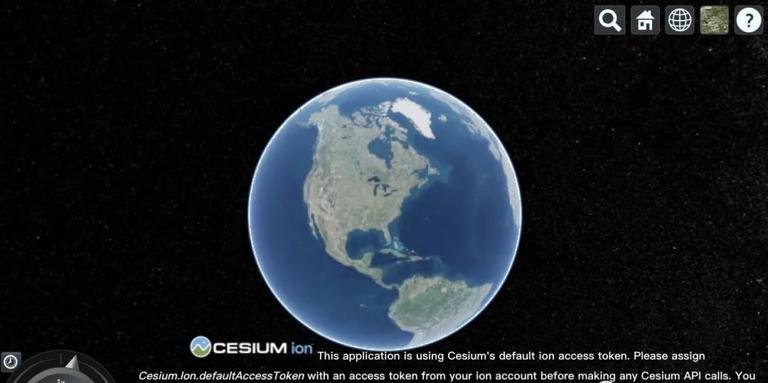
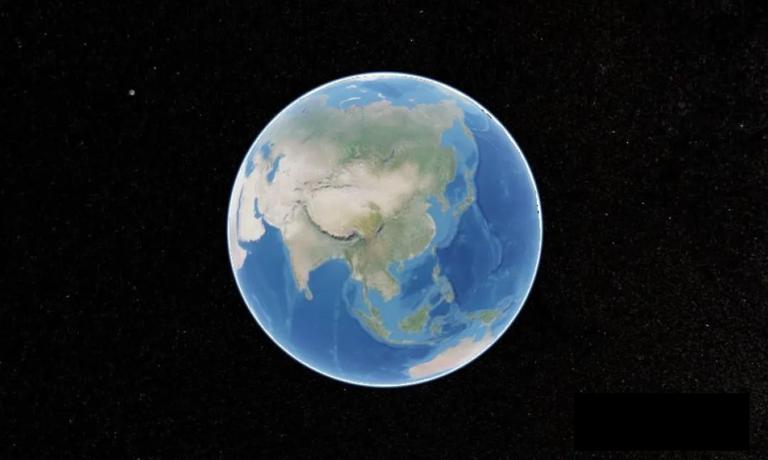
</style>As shown above, we can use the new Cesium.CesiumWidget or new Cesium.Viewer method for initialization,
either by attaching a container.
After running the project,
the effect is as follows.
Perhaps the attentive partner noticed that the viewer instance we initialized was not written in the data,
because Vue will perform data hijacking on the attributes in the data.
If the attribute is an object,
it will recursively perform data hijacking.
The viewer instance has a large number of attributes,
so if it is placed in the data... with only one outcome,
browser crashes.
We can directly declare a viewer variable on the component,
or use window. viewer to mount the viewer to the window,
which can avoid this problem.
In Vue+Cesium development,
data related to instances should not be included in the data,
which must be noted.
Control Hidden
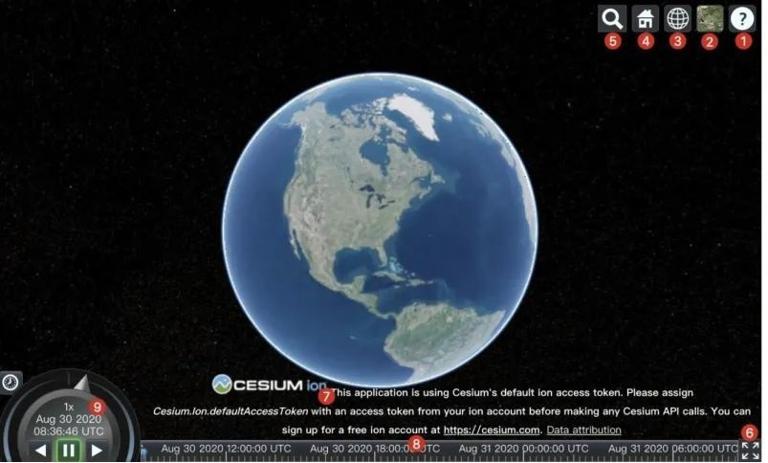
From above, we can see that in default initialization, there are many controls on the page that we cannot use during development. However, let's first introduce the functions of these controls.
When creating a Cesium instance,
the new Cesium.Viewer constructor has two parameters.
- Mandatory option for instance mounting elements
- Options Initialize Configuration Object Options
In the options object,
we can configure some initialization controls to display and hide,
as well as some rendering configurations.
Here are some commonly used configurations.
viewer = new Cesium.Viewer("cesiumContainer", {
  animation: false, // Hide animation controls
  baseLayerPicker: false, // Hide Layer Selection Control
  fullscreenButton: false, // Hide Full Screen Button
  vrButton: false, // Hide VR button, default to false
  geocoder: false, // Hide place name lookup control
  homeButton: false, // Hide Home button
  infoBox: false, // Hide the information window displayed after clicking on the element
  sceneModePicker: false, // Hide Scene Mode Selection Control
  selectionIndicator: true, // Display entity object selection box, default to true
  timeline: false, // Hide Timeline Control
  navigationHelpButton: false, // Hide Help Button
  scene3DOnly: true, // Each geometric instance will only be presented in 3D to save GPU memory
  shouldAnimate: true, // Enable automatic animation playback
  sceneMode: 3, // Initial scene mode 1:2D 2:2D Loop 3: 3D, default 3
  requestRenderMode: true, // Reduce the total time for Cesium to render new frames and reduce the overall CPU usage of Cesium in the application
  // If the elements in the scene do not change with simulation time, please consider setting maximumRenderTimeChange to a higher value, such as Infinity
  maximumRenderTimeChange: Infinity
})
We can use the options configuration above to hide all the controls on the page,
as shown in the following figure.
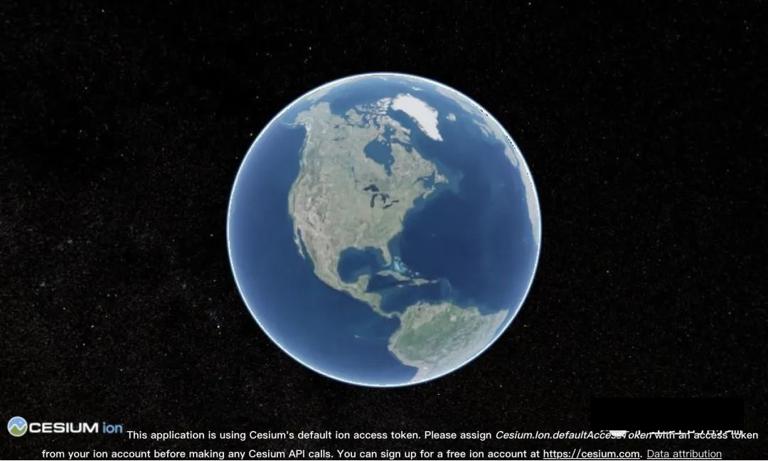
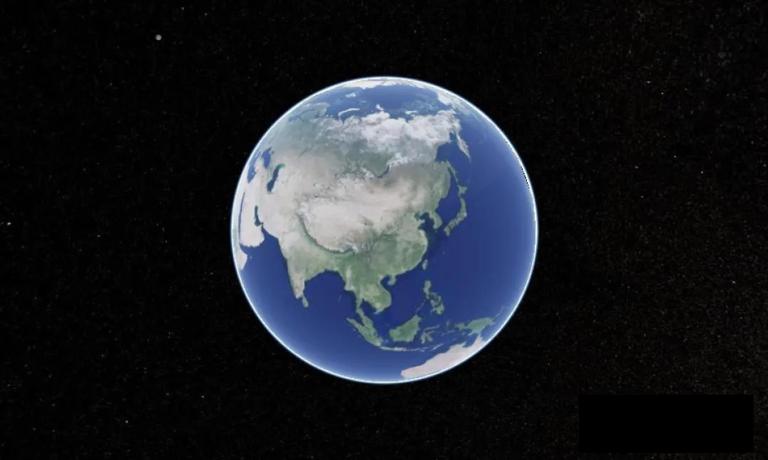
As you can see, although the control is no longer present,
there is still Cesium's logo information at the bottom of the screen,
and we need to make it not display either.
// Hide Below Cesium logo
viewer.cesiumWidget.creditContainer.style.display = "none"
As shown above, just one additional line of hidden logo information is required to obtain a clean Earth instance.
The final effect is shown below.

Load Image
Cesium supports the loading and rendering of high-precision image (map) data from multiple service sources. Layers support sorting and transparent blending, and the brightness, contrast, gamma, hue, and saturation of each layer can be dynamically modified.
Let's ignore the details here, first briefly introduce several classes related to images, and then directly write code to add some different commonly used image layers.
PS: Cesium is a constructor, on which there are countless static properties that also have different functions. According to OOP, Cesium is a parent class, and it has many subclasses to do different things.
Cesium. ImageryProvider Class
When it comes to images, first of all,
we need to understand the imageryProvider class.
Imagery can be translated as images or images,
which are collectively referred to as images here.
The ImageryProvider class and its subclasses encapsulate the methods for loading various image layers,
among which the Cesium. ImageryProvider class is an abstract class,
base class, or can be understood as an interface,
and cannot be directly instantiated.
ImageryProvider can be regarded as a data source for image layers,
and we can use the corresponding ImageryProvider type to load the desired image layer data or service.
Types contained in the ImageryProvider class:
- ArcGisMapServerImageryProvider
- Related services for ArcGIS Online and Server
- BinaMapsImageryProvider
- Bing map image, mapStyle can be specified, please refer to the BingMapsStyle class for details
- GoogleEarthEnterpriselmageryProvider
- Enterprise level services
- GridImageryProvider
- Rendering the grid inside each tile to understand the precision of each tile
- IonImageryProvider
- Imaging services provided by Cesium ion REST API
- MapboxImageryProvider
- Mapbox imaging service, specifying map style based on mapId
- MapboxStyleImageryProvider
- Mapbox imaging service, specifying map style based on styleId
-
createOpenStreetMapImageryProvider
- Image services provided by OpenStreetMap
-
SingleTilelmageryProvider
- Single image imaging service, suitable for offline data or scenarios with low requirements for image data
- TileCoordinatesImageryProvider
- Rendering the perimeter of each tile for easy debugging
- TileMapServicelmageryProvider
- According to the MapTiler specification, you can download tiles and publish services yourself, similar to the process of ArcGIS image services
- UrlTemplateImageryProvider
- Specify the format template of the URL to facilitate users to implement their own provider, such as domestic imaging services such as Gaode and Tencent. The URL is a fixed specification and can be easily implemented through this provider. And OSM is also implemented through this class
- WebMapServiceImageryProvider
- Image services that comply with the WMS specification can be encapsulated through this class and specific parameters can be specified for implementation
- WebMapTileServicelmageryProvider
- All imaging services in accordance with the WMTS1.0.0 specification can be implemented through this type of service, such as domestic sky maps
Cesium.ImageryLayer
You should know that a piece of GIS data will be organized into layers for symbolization and rendering.
The data is equivalent to internal blood and viscera,
with rich information content,
while the layers are equivalent to external fur and clothing,
used for presentation to the outside world.
Cesium also organizes data sources into layer symbolization and rendering.
The Cesium. ImageryLayer class is used to represent image layers in Cesium,
which is equivalent to fur and clothing.
It wraps the data source and requires the data source to provide it with inherently rich geographic and attribute information.
Cesium.ImageryLayerCollection
The Cesium. ImageryLayerCollection class is a container for ImageryLayer instances.
It can load and place multiple ImageryLayer instances,
and the ImageryLayer instances placed inside it are ordered.
The imageryLayers attribute contained in the Cesium.Viewer class object is an instance of the ImageryLayerCollection class,
which contains all ImageryLayer class objects of the current Cesium application, that is, all image layers currently loaded on Earth.
Knowing the architecture of the image layer foundation makes image loading simple.
We can also see that there are many types of ImageryProvider classes listed above to show you what images it can load,
but it is not realistic to demonstrate them one by one.
Therefore,
let's take a look at several common image loading methods.
Load Sky Map Image
As mentioned above, first we need to load the data source for the image layer. Cesium Earth defaults to loading the Bing map image, so we need to first remove this default image from the container.
viewer.imageryLayers.remove(viewer.imageryLayers.get(0))Then, load the data source for the image layer.
let tianditu = new Cesium.WebMapTileServiceImageryProvider({
  url:"http://t0.tianditu.com/img_w/wmts?service=wmts&request=GetTile&version=1.0.0&LAYER=img&tileMatrixSet=w&TileMatrix={TileMatrix}&TileRow={TileRow}&TileCol={TileCol}&style=default&format=tiles&tk=ebf64362215c081f8317203220f133eb",
  layer: "tdtBasicLayer",
  style: "default",
  format: "image/jpeg",
  tileMatrixSetID: "GoogleMapsCompatible",
  show: false,
})
The tk in the URL field is the Tianmap service token. Just register and apply for one on the Tianmap official website.
Subsequently, we add the data source to the ImageryLayer class container for symbolization and rendering.
There are two ways to add a data source to the ImageryLayer class container for symbolization and rendering. The first is in the options configuration when initializing the viewer instance. You can directly place the data source in the imageryProvider property of the options object.
new Cesium.Viewer("cesiumContainer",{
  imageryProvider: tianditu
})
The second method is to use the addImageryProvider method of the imageryLayers property in the viewer instance to add it.
let imagery = viewer.imageryLayers.addImageryProvider(tianditu)Load Google Images
We have already learned the above steps, so we won't go into detail. Just look at the code directly below:
viewer.imageryLayers.remove(viewer.imageryLayers.get(0))
let imagery = viewer.imageryLayers.addImageryProvider(
  new Cesium.UrlTemplateImageryProvider({
    url: "http://mt1.google.cn/vt/lyrs=s&hl=zh-CN&x={x}&y={y}&z={z}&s=Gali",
    baseLayerPicker : false
  })
)
Google Image Preview Below:

Loading ArcGIS images
viewer.imageryLayers.remove(viewer.imageryLayers.get(0))
let imagery = viewer.imageryLayers.addImageryProvider(
  new Cesium.ArcGisMapServerImageryProvider({
    url:'https://services.arcgisonline.com/ArcGIS/rest/services/World_Imagery/MapServer',
    baseLayerPicker : false
  })
)
ArcGIS image preview is as follows
Load Gaode Image
viewer.imageryLayers.remove(viewer.imageryLayers.get(0))
let imagery = viewer.imageryLayers.addImageryProvider(
  new Cesium.UrlTemplateImageryProvider({
    maximumLevel:18,//Maximum zoom level
    url : 'https://webst02.is.autonavi.com/appmaptile?style=6&x={x}&y={y}&z={z}',
    style: "default",
    format: "image/png",
    tileMatrixSetID: "GoogleMapsCompatible"
  })
)
The preview of Gaode Image is as follows
Load Sky Map Annotations
The loading of the above image shows that there are no labels on the map, so we need to add additional labels. Similarly, it is also a layer.
let label = viewer.imageryLayers.addImageryProvider(
  new Cesium.WebMapTileServiceImageryProvider({
    url: "http://t0.tianditu.com/cia_w/wmts?service=wmts&request=GetTile&version=1.0.0&LAYER=cia&tileMatrixSet=w&TileMatrix={TileMatrix}&TileRow={TileRow}&TileCol={TileCol}&style=default.jpg"+"&tk="+"19b72f6cde5c8b49cf21ea2bb4c5b21e",
    layer: "tdtAnnoLayer",
    style: "default",
    maximumLevel: 18, //The maximum zoom level of the sky map
    format: "image/jpeg",
    tileMatrixSetID: "GoogleMapsCompatible",
    show: false,
  })
)
Similarly, just like the sky map image, don't forget to replace the TK.
The preview of the heaven and earth icon annotations is as follows:
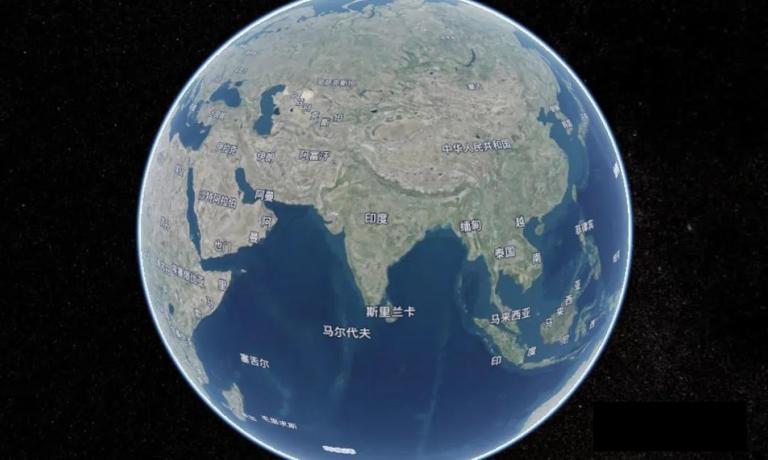
Image brightness adjustment
After loading the image and obtaining the image instance imagery,
we can adjust the brightness through its brightness attribute,
with values ranging from 0 to 1.
The default value is 1.
imagery.brightness = 0.9