Comprehensive summary of the new features of Vue 3.0
Vue3.0 has been updating and optimizing since its first One Piece version was released in September 20. The Chinese version of the official documentation has also been released; so as end users, let's take a look at what new features and features have been added to Vue3.
Several highlights of Vue 3.0:
- Performance: performance optimization
- Tree-shaking support: support for tree shaking optimization
- Composition API: composite API
- Fragment,Teleport,Suspense: new component
- Better TypeScript support: better TypeScript support
- Custom Renderer API: custom renderer
In terms of performance, compared to Vue2. x, the performance has been improved by about 1.3 to 2 times; The packaged volume is also smaller. If you only write a HelloWorld for packaging, it will only be 13.5kb; With all runtime features, it's only 22.5 kb.
So, as end users, how are we different from Vue2. x in development? Talk is cheap, let's still look at the code.
Tree-shaking
One of the most important changes to Vue3 is the introduction of Tree Shaking, which is evident in its smaller bundle size. In version 2. x, many functions are mounted on global Vue objects, such as nextTick, nextTick, nextTick, set, and other functions. Therefore, although we may not be able to use them, as long as the global functions such as vue are introduced during packaging, they will still be packaged into the bundle.
In Vue3, all APIs are introduced through ES6 modularity, which allows packaging tools such as webpack or rollup to eliminate unused APIs during packaging, minimizing bundle volume; We can find such changes in main.js:
//src/main.js
Import {createApp} from "vue"
Import App from ". / App.vue"
Import router from ". / router"

Const app = createApp (App)
App.use (router) .mount ("# app")
The method of creating an app instance has changed from the original new Vue() to creating through the createApp function; However, some core functions such as the virtualDOM update algorithm and responsive systems will be packaged anyway; The change brought about by this is that previously configured components (Vue. component), instructions (Vue. directive), mixins (Vue. mixins), and plugins (Vue. use) have been changed to methods that are directly attached to the instance; The advantage of calling through the created instance is that an application can have multiple Vue instances, and the configurations between different instances do not affect each other:
Const app = createApp (App)
App.use (/ *... * /)
App.mixin (/ *... * /)
App.component (/ *... * /)
App.directive (/ *... * /)
Therefore, the following global APIs for Vue2. x also need to be introduced as ES6 modularity:
- Vue.nextTick
- Vue.observable is no longer supported, changed to reactive
- Vue.version
- Vue.compile (full build only)
- Vue.set (compatible with builds only)
- Vue.delete (compatible with builds only)
In addition, both vuex and vue-router have made improvements using Tree-Shaking. However, the syntax of api has not changed much:
 //src/store/index.js
Import {createStore} from "vuex"

Export default createStore ({
State: {}
Mutations: {}
Actions: {}
Modules: {}
 });
 //src/router/index.js
Import {createRouter, createWebHistory} from "vue-router"

Const router = createRouter ({
History: createWebHistory (process.env.BASE_URL)
Routes
});
More information about the use of Tree-Shaking can be found in the full parsing of Webpack configuration.
Life cycle function
As we all know, there are eight lifecycle functions in Vue2. x:
- BeforeCreate
- Created
- BeforeMount
- Mounted
- BeforeUpdate
- Updated
- BeforeDestroy
- Destroyed
In vue3, a new setup life cycle function is added, and the timing of setup execution is before the beforeCreate life function. Therefore, it is not possible to get the instance through this in this function; at the same time, for the sake of naming unity Rename beforeDestroy to beforeUnmount,destroyed to unmounted, so vue3 has the following lifecycle functions:
- BeforeCreate (setup is recommended instead)
- Created (setup is recommended instead)
- Setup
- BeforeMount
- Mounted
- BeforeUpdate
- Updated
- BeforeUnmount
- Unmounted
At the same time, vue3 has added lifecycle hooks, and we can access the lifecycle of components by adding on before the lifecycle function. We can use the following lifecycle hooks:
- OnBeforeMount
- OnMounted
- OnBeforeUpdate
- OnUpdated
- OnBeforeUnmount
- OnUnmounted
- OnErrorCaptured
- OnRenderTracked
- OnRenderTriggered
So how do these hook functions be called? We mount lifecycle hooks in setup When the corresponding life cycle is reached, the corresponding hook function is called:
Import {onBeforeMount, onMounted} from "vue"
Export default {
Setup () {
  Console.log ("- setup----")
  OnBeforeMount () = > {
    / / beforeMount code execution
  });
  OnMounted () = > {
    / / mounted code execution
  });
}
}
New Featur
After talking about the lifecycle, here are the new features we look forward to adding to Vue3.
Responsive API
We have been studying Object.defineProperty and Proxy in depth, explaining the advantages of Proxy and why Vue3 is using Proxy to achieve responsiveness. At the same time, Vue3 has also extracted some responsive APIs to better reuse code.
We can use reactive to create responsive states for JS objects:
Import {reactive, toRefs} from "vue"
Const user = reactive ({
Name: 'Vue2'
Age: 18
});
 User.name = 'Vue3'
Reactive is equivalent to Vue.observable in Vue2. x.
The reactive function only accepts complex data types such as object and array.
For some basic data types, such as strings and numeric values, we want to make it responsive Of course, we can also create objects through the reactive function, but Vue3 provides another function, ref:
Import {ref} from "vue"
 Const num = ref (0)
Const str = ref ("")
 Const male = ref (true)

 Num.value++
Console.log (num.value)

 Str.value = "new val"
Console.log (str.value)

Male.value = false
Console.log (male.value)
The responsive object returned by ref is a RefImpl object that contains only one parameter named value, and is obtained and modified in js through its value attribute; However, when rendered in a template, the internal values are automatically expanded, so there is no need to append .value to the template.
<template>
  <div>
    <span>{{ count }}</span>
    <button @click="count ++">Increment count</button>
  </div>
</template>

<script>
  Import {ref} from 'vue'
  Export default {
    Setup () {
      Const count = ref (0)
      Return {
        Count
      }
    }
  }
</script>
Reactive is mainly responsible for complex data structures, while ref mainly deals with basic data structures But many children's shoes will misunderstand that ref can only handle basic data, and ref itself can also handle objects and arrays:
Import {ref} from "vue"

Const obj = ref ({
  Name: "qwe"
  Age: 1
});
SetTimeout () = > {
  Obj.value.name = "asd"
}, 1000)


SetTimeout () = > {
  List.value.push (7)
}, 2000)
When we are dealing with the property of some large responsive objects, we would like to use the deconstruction of ES6 to get the values we want:
Let book = reactive ({
  Name: 'Learn Vue'
  Year: 2020
  Title: 'Chapter one'
})
Let {
  Name
} = book

Name = 'new Learn'
/ / Learn Vue
Console.log (book.name)
Unfortunately, this eliminates its responsiveness; in this case, we can convert the responsive object into a set of ref These ref will retain a responsive association with the source object:
Let book = reactive ({
  Name: 'Learn Vue'
  Year: 2020
  Title: 'Chapter one'
})
Let {
  Name
} = toRefs (book)

/ / Note that the name deconstructed here is a ref object.
/ / you need to use value to take values and assign values.
Name.value = 'new Learn'
/ / new Learn
Console.log (book.name)
For some read-only data, we want to prevent any changes to it, and we can create a read-only object through readonly:
Import {reactive, readonly} from "vue"
Let book = reactive ({
  Name: 'Learn Vue'
  Year: 2020
  Title: 'Chapter one'
})

Const copy = readonly (book)
/ / Set operation on key "name" failed: target is readonly.
Copy.name = "new copy"
Sometimes the values we need depend on the state of other values. In vue2. x, we use the computed function to calculate properties. In vue3, the computed function is extracted, accepting a getter function, and creating an immutable responsive ref object for the value returned by the getter:
Const num = ref (0)
Const double = computed (() = > num.value * 2)
Num.value++
/ / 2
Console.log (double.value)
/ / Warning: computed value is readonly
Double.value = 4
Alternatively, we can use the get and set functions to create a read-write ref object:
Const num = ref (0)
Const double = computed ({
  Get: () = > num.value * 2
  Set: (val) = > (num.value = val / 2)
});

Num.value++
/ / 2
Console.log (double.value)

Double.value = 8
/ / 4
Console.log (num.value)
Responsive interception
Corresponding to computed, watch,computed is a many-to-one relationship, while watch is an one-to-many relationship. Vue3 also provides two functions to listen for changes in the data source: watch and watchEffect.
Let's first take a look at watch, which is used in exactly the same way as the watch option of a component, and needs to listen on a data source Then execute the specific callback function, and let's first look at how it listens to a single data source:
Import {reactive, ref, watch} from "vue"

Const state = reactive ({
  Count: 0
});

/ / getter function is returned when listening
Watch (
  () = > state.count
  (count, prevCount) = > {
    / / 1 0
    Console.log (count, prevCount)
  }
);
State.count++

Const count = ref (0)
/ / listen to ref directly
Watch (count, (count, prevCount) = > {
  / / 2 0
  Console.log (count, prevCount, "watch")
});
Count.value = 2
We can also listen for multiple values in an array, and the final value is returned as an array:
Const state = reactive ({
  Count: 1
});
Const count = ref (2)
watch([() => state.count, count], (newVal, oldVal) => {
  / / [3, 2] [1, 2]
  / / [3, 4] [3, 2]
  Console.log (newVal, oldVal)
});
State.count = 3

Count.value = 4
If we are listening for a deeply nested object property change, we need to set deep:true:
Const deepObj = reactive ({
  A: {
    B: {
      C: "hello"
    }
  }
});

Watch (
  () = > deepObj
  (val, old) = > {
    / / new hello new hello
    Console.log (val.a.b.c, old.a.b.c)
  }
  {deep: true}
);

DeepObj.a.b.c = "new hello"
The final print results can be found to be changed values, because listening on a responsive object always returns a reference to that object, so we need to make a deep copy of the value:
Import _ from "lodash"
Const deepObj = reactive ({
  A: {
    B: {
      C: "hello"
    }
  }
});

Watch (
  () = > _ .cloneDeep (deepObj)
  (val, old) = > {
    / / new hello hello
    Console.log (val.a.b.c, old.a.b.c)
  }
  {deep: true}
);

DeepObj.a.b.c = "new hello"
Generally, listening stops automatically when the component is destroyed, but sometimes we want to stop it manually before the component is destroyed. You can call the stop function returned by watch to stop:
Const count = ref (0)

Const stop = watch (count, (count, prevCount) = > {
/ / do not execute
Console.log (count, prevCount)
});

SetTimeout () = > {
Count.value = 2
}, 1000)
/ / stop watch
Stop ()
There is also a function watchEffect that can also be used to listen, but there is already a watch What's the difference between this watchEffect and watch? Their usage is mainly different in the following ways:
1.WatchEffect does not need to manually pass in dependencies
2.Each time the watchEffect initializes, it executes a callback function to automatically obtain dependencies
3.WatchEffect cannot obtain the original value, only the changed value can be obtained
Import {reactive, ref, watch, watchEffect} from "vue"

Const count = ref (0)
Const state = reactive ({
Year: 2021
});

 WatchEffect () = > {
Console.log (count.value)
Console.log (state.year)
});
SetInterval () = > {
Count.value++
State.year++
}, 1000)
WatchEffect automatically executes once when the page is loaded, tracking responsive dependencies When the timer is executed every 1s after loading, watchEffect will listen for changes in the data and execute it automatically. The changed value is obtained for each execution.
Combined API
Composition API (combined API) is also the most important function in Vue3. The previous 2.x version used Options API (option API), which is officially defined: Data, computed, methods, you can write wherever you need it. The problem is that as the function increases, The code is becoming more and more complex, and we see that the code needs to jump up and down repeatedly:
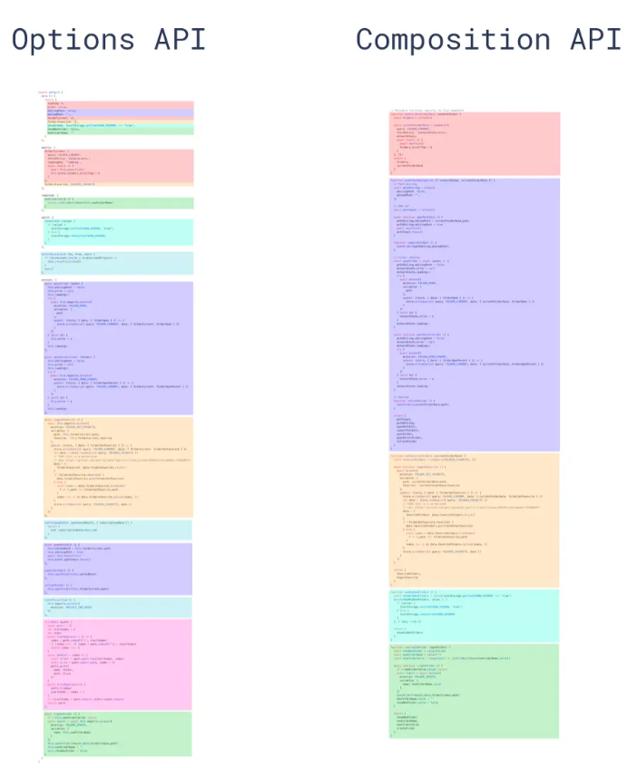
In the figure above, a color represents a function, and we can see that the function code of Options API is relatively scattered. On the other hand, Composition API can organize the logic of the same function in a function, which is convenient for maintenance.
Let's first take a look at the previous writing of Options API:
Export default {
Components: {}
Data () {}
Computed: {}
Watch: {}
Mounted () {}
}
Options API is to put the same type of things in the same option, when we have less data. This organization is relatively clear; but as the data increases, the function points we maintain will involve multiple data and methods But we don't know which data and methods are involved, and we often need to switch back and forth to find them. Even the need to understand the logic of other functions makes it difficult for components to understand and read.
What Composition API does is put the code of the same function together to maintain. So when we need to maintain a function point, we don't have to worry about other logic. Focus only on the current functionality; Composition API organizes the code through the setup option:
Export default {
Setup (props, context) {}
}
We see here that it receives two parameters, props and context, which are some data passed in by the parent component. Context is a context object and some attributes exposed from 2. x:
- Attrs
- Slots
- Emit
Note: the data of props also needs to be deconstructed by toRefs, otherwise the responsive data will become invalid.
Let's take a look at the specific use of setup through a Button button:
<template>
  <div>{{ state.count }} * 2 = {{ double }}</div>
  <div>{{ num }}</div>
  <div @click="add">Add</div>
</template>
<script>
Import {reactive, computed, ref} from "vue"
Export default {
  Name: "Button"
  Setup () {
    Const state = reactive ({
      Count: 1
    });
    Const num = ref (2)
    Function add () {
      State.count++
      Num.value + = 10
    }
    Const double = computed (() = > state.count * 2)
    Return {
      State
      Double
      Num
      Add
    }
  }
}
</script>
Many children's shoes may have doubts. Is this no different from what I wrote in data and methods? Isn't it just to put them together? We can extract the functions in setup and divide them into a separate function. Each function can also be logically reused in different components:
Export default {
Setup () {
  Const {networkState} = useNetworkState ()
  Const {user} = userDeatil ()
  Const {list} = tableData ()
  Return {
    NetworkState
    User
    List
  }
}
 }
 Function useNetworkState () {}
Function userDeatil () {}
Function tableData () {}
Fragment
The so-called fragment is a fragment; In vue2. x, it is required that each template must have a root node, so our code should be written as follows:
<template>
  <div>
    <span></span>
    <span></span>
  </div>
</template>
Or in Vue2. x, you can also introduce the vue fragments library, replacing div with a virtual fragment; In React, the solution is to create a virtual element through a React.Fragment tag in; In Vue3, we can directly eliminate the need for a root node:
<template>
    <span>hello</span>
    <span>world</span>
</template>
This reduces a lot of meaningless div elements.
Teleport
Teleport translates to mean to transmit or transmit over long distances; as the name implies It can transfer elements or components in the slot to other locations on the page:
In React, you can use the createPortal function to create nodes that need to be transmitted. Think of the name Portal, but the H5 native Portal tag is also planned. Although there are some security issues, it was changed to Teleport in order to avoid duplicate names.
A common usage scenario for Teleport is to shift the location of modal boxes in some deeply nested components. Although logically the modal box belongs to this component, but in terms of style and DOM structure Nesting levels deeper is not good for maintenance (z-index, etc.); so we need to strip it out:
<template>
  <button @click="showDialog = true">Open Modal Box</button>

  <teleport to="body">
    <div class="modal" v-if="showDialog" style="position: fixed">
      I am a mode box.
      <button @click="showDialog = false">Close</button>
      <child-component :msg="msg"></child-component>
    </div>
  </teleport>
</template>
<script>
Export default {
  Data () {
    Return {
      ShowDialog: false
      Msg: "hello"
    }
  }
}
</script>
The modal div in the Teleport here is transferred to the bottom of the body; although it is rendered in different places But the elements and components in Teleport are still logical subcomponents of the parent component. You can still communicate data with the parent component. Teleport receives two parameters, to and disabled:
- To-string: must be a valid query selector or HTMLElement,
- can be id or class selector, etc.
- Disabled-boolean: if true means that teleport is disabled,
- its slot contents will not be moved to any location, and false will not be disabled by default.
Suspense
Suspend is a built-in component launched by Vue3, which allows our programs to render some backup content while waiting for asynchronous components, allowing us to create a smooth user experience; The asynchronous component loaded in Vue already exists in Vue2.x. The routing component loaded in Vue router we use is actually an asynchronous component:
Export default {
Name: "Home"
Components: {
  AsyncButton: () = > import (".. / components/AsyncButton")
}
 }
Redefined in Vue3, asynchronous components need to be defined through defineAsyncComponent for display:
/ / globally define asynchronous components
 //src/main.js
Import {defineAsyncComponent} from "vue"
Const AsyncButton = defineAsyncComponent (() = >
Import (". / components/AsyncButton.vue")
 );
App.component ("AsyncButton", AsyncButton)


/ / define asynchronous components within the component
/ / src/views/Home.vue
Import {defineAsyncComponent} from "vue"
Export default {
Components: {
  AsyncButton: defineAsyncComponent (() = >
    Import (".. / components/AsyncButton")
  ),
}
}
At the same time, asynchronous components can be managed more finely:
Export default {
 Components: {
  AsyncButton: defineAsyncComponent ({
    Delay: 100
    Timeout: 3000
    Loader: () = > import (".. / components/AsyncButton")
    ErrorComponent: ErrorComponent
    OnError (error, retry, fail, attempts) {
      If (attempts < = 3) {
        Retry ()
      } else {
        Fail ()
      }
    }
  })
}
 }
In this way, we can control the loading of asynchronous components, reload or show the abnormal state even if the load fails:
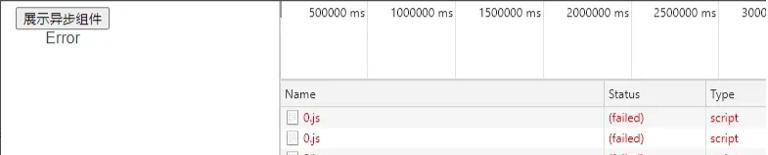
Let's go back to Suspense, which says that it mainly renders some backup content when the component is loaded. It provides two slot slots, one default default and one state in fallback load:
<template>
  <div>
    <button @click="showButton">Demonstrate asynchronous components</button>
    <template v-if="isShowButton">
      <Suspense>
        <template #default>
          <AsyncButton></AsyncButton>
        </template>
        <template #fallback>
          <div>Component loading...</div>
        </template>
      </Suspense>
    </template>
  </div>
</template>
<script>
Export default {
  Setup () {
    Const isShowButton = ref (false)
    Function showButton () {
      IsShowButton.value = true
    }
    Return {
      IsShowButton
      ShowButton
    }
  }
}
</script>
Incompatible featur
Incompatible features are mainly syntax changes that have significantly changed with the version of Vue2. x, and may already have compatibility issues with Vue3.
Data, mixin and filter
In Vue2. x, we can define data as an object or function, but we know that if data is an object in a component, there will be data interaction because the object is a reference data type;
In Vue3, data only accepts function types and returns objects through function; At the same time, the merge behavior of Mixin has also changed. When the mixin and the data in the base class are merged, shallow copy merging will be performed:
Const Mixin = {
  Data () {
    Return {
      User: {
        Name: 'Jack'
        Id: 1
        Address: {
          Prov: 2
          City: 3
        }
      }
    }
  }
}
Const Component = {
  Mixins: [Mixin]
  Data () {
    Return {
      User: {
        Id: 2
        Address: {
          Prov: 4
        }
      }
    }
  }
}

/ / vue2 result:
{
  Id: 2
  Name: 'Jack'
  Address: {
    Prov: 4
    City: 3
  }
}

/ / vue3 result:
User: {
  Id: 2
  Address: {
    Prov: 4
  }
}
When we see the final merge result, vue2.x will perform a deep copy, merging and copying the data in the data downward; While Vue3 only performs shallow copying, it does not merge and copy data that already exists in the data.
In vue2.x, we can also process the presentation of some text content through a filter:
<template>
  <div>{{ status | statusText }}</div>
</template>
<script>
  Export default {
    Props: {
      Status: {
        Type: Number
        Default: 1
      }
    }
    Filters: {
      StatusText (value) {
        If (value = 1) {
          Return 'order not placed'
        } else if (value = 2) {
          Return 'order to be paid'
        } else if (value = 3) {
          Return 'order completed'
        }
      }
    }
  }
</script>
The most common is the copywriting display that deals with some orders; however, in vue3, the filter filter has been removed No longer supported, it is officially recommended to use method calls or the evaluation property computed instead.
V-model
In Vue2.x, v-model is equivalent to binding the value property and the input event, which is essentially a syntactic sugar:
<child-component v-model="msg"></child-component>
 <!-- amount to -->
<child-component :value="msg" @input="msg=$event"></child-component>
In some cases, we need to bind multiple values bidirectionally, and other values need to be changed using callback functions as shown:
< child-component
    VMI model = "msg"
    : msg1= "msg1"
    @ change1= "msg1=$event"
    : msg2= "msg2"
    @ change2= "msg2=$event" >
</child-component>
In version 2.3.0+of vue, the .sync modifier was introduced, which is also a syntax sugar in nature, The @update:propName callback is bound to the component, and the syntax is more concise:
< child-component
    : msg1.sync= "msg1"
    : msg2.sync= "msg2" >
</child-component>

<!-- amount to -->

< child-component
    : msg1= "msg1"
    @ update:msg1= "msg1=$event"
    : msg2= "msg2"
    @ update:msg2= "msg2=$event" >
</child-component>
Vue3 integrates v-model and .sync instead of .sync, saying: Multiple bi-directional bound value values can be transmitted directly through multiple v-model. At the same time, the default prop name passed by v-model has been changed from value to modelValue:
< child-component
    VMI model = "msg" >
</child-component>

<!-- amount to -->
< child-component
  : modelValue= "msg"
  @ update:modelValue= "msg = $event" >
</child-component>
If we want to pass multiple values through v-model, we can pass an argument to v-model:
< child-component
    Msg1 = "msg1"
    VMurmodel.msg2 = "msg2" >
</child-component>

<!-- amount to -->
< child-component
    : msg1= "msg1"
    @ update:msg1= "msg1=$event"
    : msg2= "msg2"
    @ update:msg2= "msg2=$event" >
</child-component>
V-for and key
In Vue2.x, we all know that v-for needs to give each child node a unique key for each loop Cannot be bound to the template tag yet
<template v-for="item in list">
  <div :key="item.id">...</div>
  <span :key="item.id">...</span>
</template>
In Vue3, the key value should be placed on the template tag so that we don't have to set it for each child node:
<template v-for="item in list" :key="item.id">
  <div>...</div>
  <span>...</span>
</template>
V-bind merger
In vue2.x, if an element defines both vmurbind = "object" and the same separate attribute Then this separate property overrides the binding in object:
<div id="red" v-bind="{ id: 'blue' }"></div>
<div v-bind="{ id: 'blue' }" id="red"></div>

<!-- The final result is the same -->
<div id="red"></div>
In vue3, however, if an element defines both vmurbind = "object" and the same separate attribute Then the order in which the binding is declared determines the final result (the latter overrides the former):
<!-- template -->
<div id="red" v-bind="{ id: 'blue' }"></div>
<!-- result -->
<div id="blue"></div>

<!-- template -->
<div v-bind="{ id: 'blue' }" id="red"></div>
<!-- result -->
<div id="red"></div>
Ref in v-for
In vue2.x, using the ref attribute on v-for, you get an array through this.$refs:
< template
  <div v-for="item in list" :ref="setItemRef"></div>
</template>
<script>
Export default {
  Data () {
    List: [1, 2]
  }
  Mounted () {
    / / [div, div]
    Console.log (this.$refs.setItemRef)
  }
}
</script>
But this may not be what we want; so vue3 no longer automatically creates arrays Instead, it changes the way ref is handled into a function, which is passed into this node by default:
< template
  <div v-for="item in 3" :ref="setItemRef"></div>
</template>
<script>
Import {reactive, onUpdated} from 'vue'
Export default {
  Setup () {
    Let itemRefs = reactive ( [])

    Const setItemRef = el = > {
      ItemRefs.push (el)
    }

    OnUpdated () = > {
      Console.log (itemRefs)
    })

    Return {
      ItemRefs
      SetItemRef
    }
  }
}
</script>
V-for and v-if priority
In vue2.x, there is a higher priority for using both v-for and VMI if for on the same element. Therefore, an important point for performance optimization in vue2.x is that v-for and v-if cannot be placed on the same element.
In vue3, v-if has a higher priority than v-for. So the following code works properly in vue2.x However, when v-if takes effect in vue3, there is no item variable, so an error will be reported:
<template>
  <div v-for="item in list" v-if="item % 2 === 0" :key="item">{{ item }}</div>
</template>

<script>
Export default {
  Data () {
    Return {
      List: [1, 2, 3, 4, 5]
    }
  }
}
</script>
Summary
The above are some of the new features and functions that we may be involved in using Vue3.0 as a terminal. In fact, there are many changes to Vue3.0, which will not be covered here due to space reasons. You can consult the official documentation on your own and expect Vue3 to bring us a more convenient and friendly development experience.